A firewall, is a system that allows you to protect a server or a network of servers from intrusions coming from another network. The most common use is to protect your Internet network.
A firewall works like the security personnel at the door of a nightclub. All traffic that is not on the allowed list cannot get in or out. A firewall's list contains a set of predefined rules that allow:
There are two types of security policies:
The first method is the most secure, but requires a precise definition of the communication needs of the entire network. This way we make sure to block in case of doubt and only let through what we know.
The main difference between firewalls known as Layer 3 or Layer 4 lies in their ability to remember analyzed packets and analyze sessions.
You should also know that there are new and more modern firewalls that are able to analyze other types of traffic or, better said, go deeper into what a user is requesting from your server and make better decisions to block or not. Always based on offering maximum security. These firewalls are called Next Generation Firewalls or Layer 7 firewalls.
Manageable means that you yourself can define, create, modify or delete both the filtering rules and the actions performed by the Firewall at any time and for any of the IPs on your server or Cloud. To do this, SWPanel provides a series of options and tools that will allow you to easily customize your Firewall, and consequently, protect your environment and your data.
A Firewall rule is a set of conditions that allow the Firewall to determine whether a traffic should be managed and what kind of management should be done on it.
A rule is formed through different parts and conditions that we detail below:
Traffic may be:
Traffic can be:
Incoming: Internet to your cloud or server.
Outgoing: from your cloud or server to the Internet.
The IPs indicate the origin or destination of the traffic to be filtered.
Source IP
Indicates the IP from which we will receive the traffic. Selecting "any IP" means that this rule affects all IPs on the Internet.
Destination IP
Indicates to which IP of our Cloud or Server we want to apply this rule.
If our Cloud or Server has several IPs, we will be able to create independent rules for each of our IPs.
Indicate the communication protocols used to which the rule will be applied. TCP or UDP protocols are accepted.
TCP (Transmission Control Protocol).
TCP is used in most data communications.
Functions of TCP
In TCP/IP protocols. TCP is the intermediate layer between the network protocol (IP) and the application. Often, applications need reliable communication over the network. TCP is implemented for this purpose because it ensures that the data sent by the client are received by the server without errors and in the same order as they were sent, despite working with the services of the IP layer, which is not reliable. It is a connection-oriented protocol, since the client and the server must announce and accept the connection before starting to transmit the data to this user who is to receive them.
TCP features:
TCP segment format
At the transport level, the bit packets that constitute the TCP protocol data units are called "segments".
User Datagram Protocol (UDP).
It is a minimal message-oriented transport level protocol documented in IETF RFC 768.
In the Internet protocol family UDP provides a simple interface between the network layer and the application layer. UDP does not grant guarantees for the delivery of its messages (so it really should not be found at layer 4) and the UDP origin does not retain states of UDP messages that have been sent to the network. UDP only adds application multiplexing and checksumming of the header and payload. Any kind of guarantees for the transmission of information must be implemented at higher layers.
Application usage
Most key Internet applications use the UDP protocol, including the Domain Name System where queries must be fast, and will only count as a single request after a single packet response, the Network Management Protocol, the Routing Information Protocol (RIP) and the Dynamic Host Configuration Protocol.
TCP and UDP use ports to enable communication between applications. The port field is 16 bits long, so the range of valid values is from 0 to 65535. Port 0 is reserved, but is an allowed value as a source port if the sending process does not expect to receive messages in response.
In the case of our perimeter firewall it indicates the port that will manage the rule. There is the possibility of not specifying any port and traffic from any port will be handled, as well as the possibility of specifying a set or range of ports.
The first step is to choose the Cloud or server on which you want to activate the Firewall management.
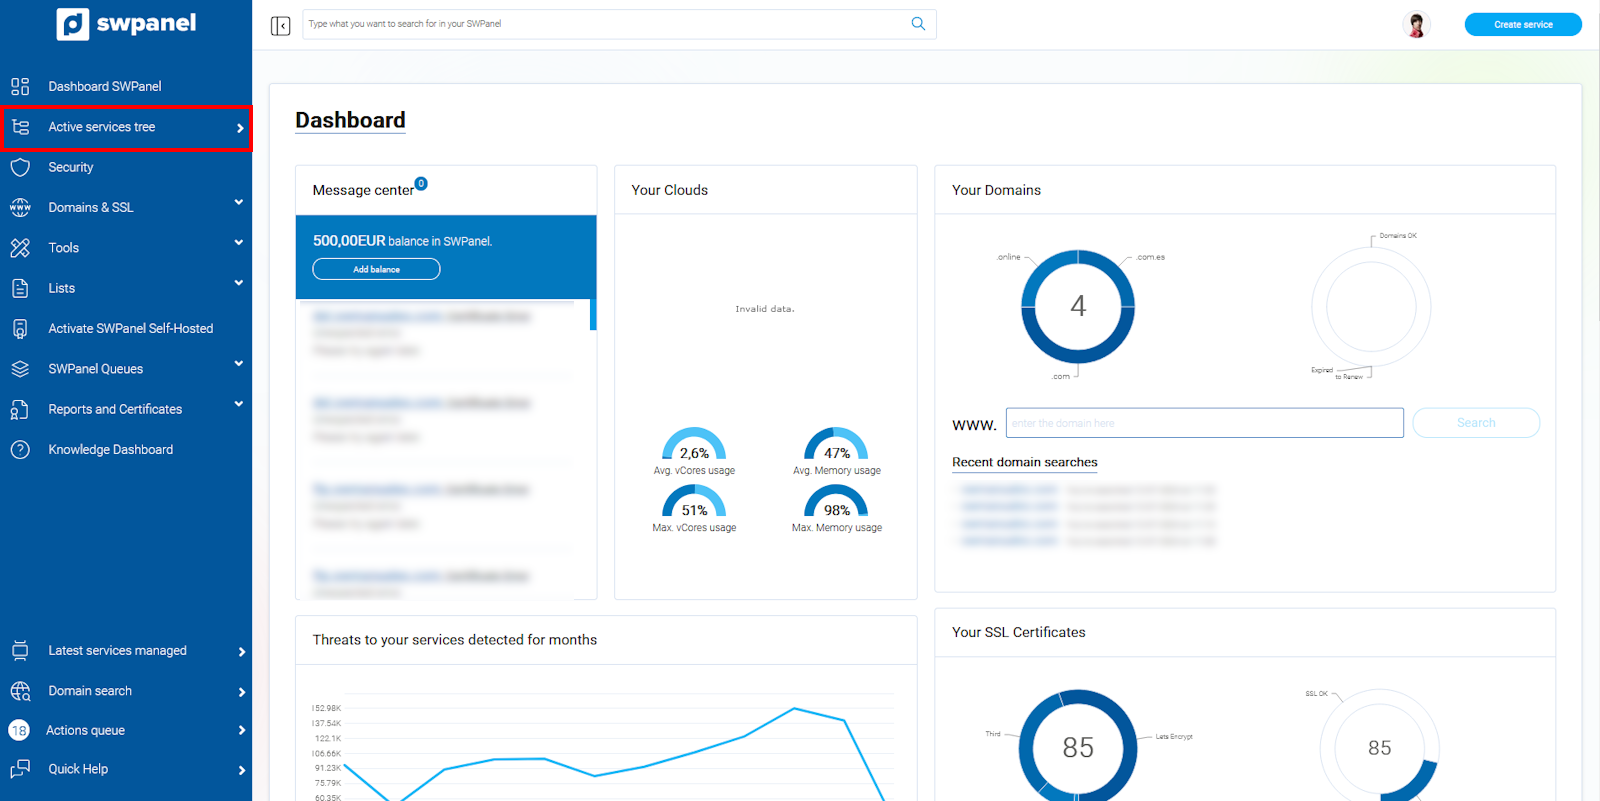
Go to the services tree of your SWPanel.

info_capture The screenshot is for guidance only. It was taken on version 2025.00.0017 with date 14/12/2024. It may differ from what the current version of SWPanel displays.
Select the server or Cloud on which you want to activate Firewall management.

info_capture The screenshot is for guidance only. It was taken on version 2025.00.0017 with date 14/12/2024. It may differ from what the current version of SWPanel displays.
Once selected, SWPanel will show you the Dashboard of this service.
On the Dashboard you will find the Available Enhancements box and in it you will find the Layer 4 Firewall Management option and a switch to enable or disable it on the right.

info_capture The screenshot is for guidance only. It was taken on version 2025.00.0017 with date 14/12/2024. It may differ from what the current version of SWPanel displays.
Click on the switch to activate it.
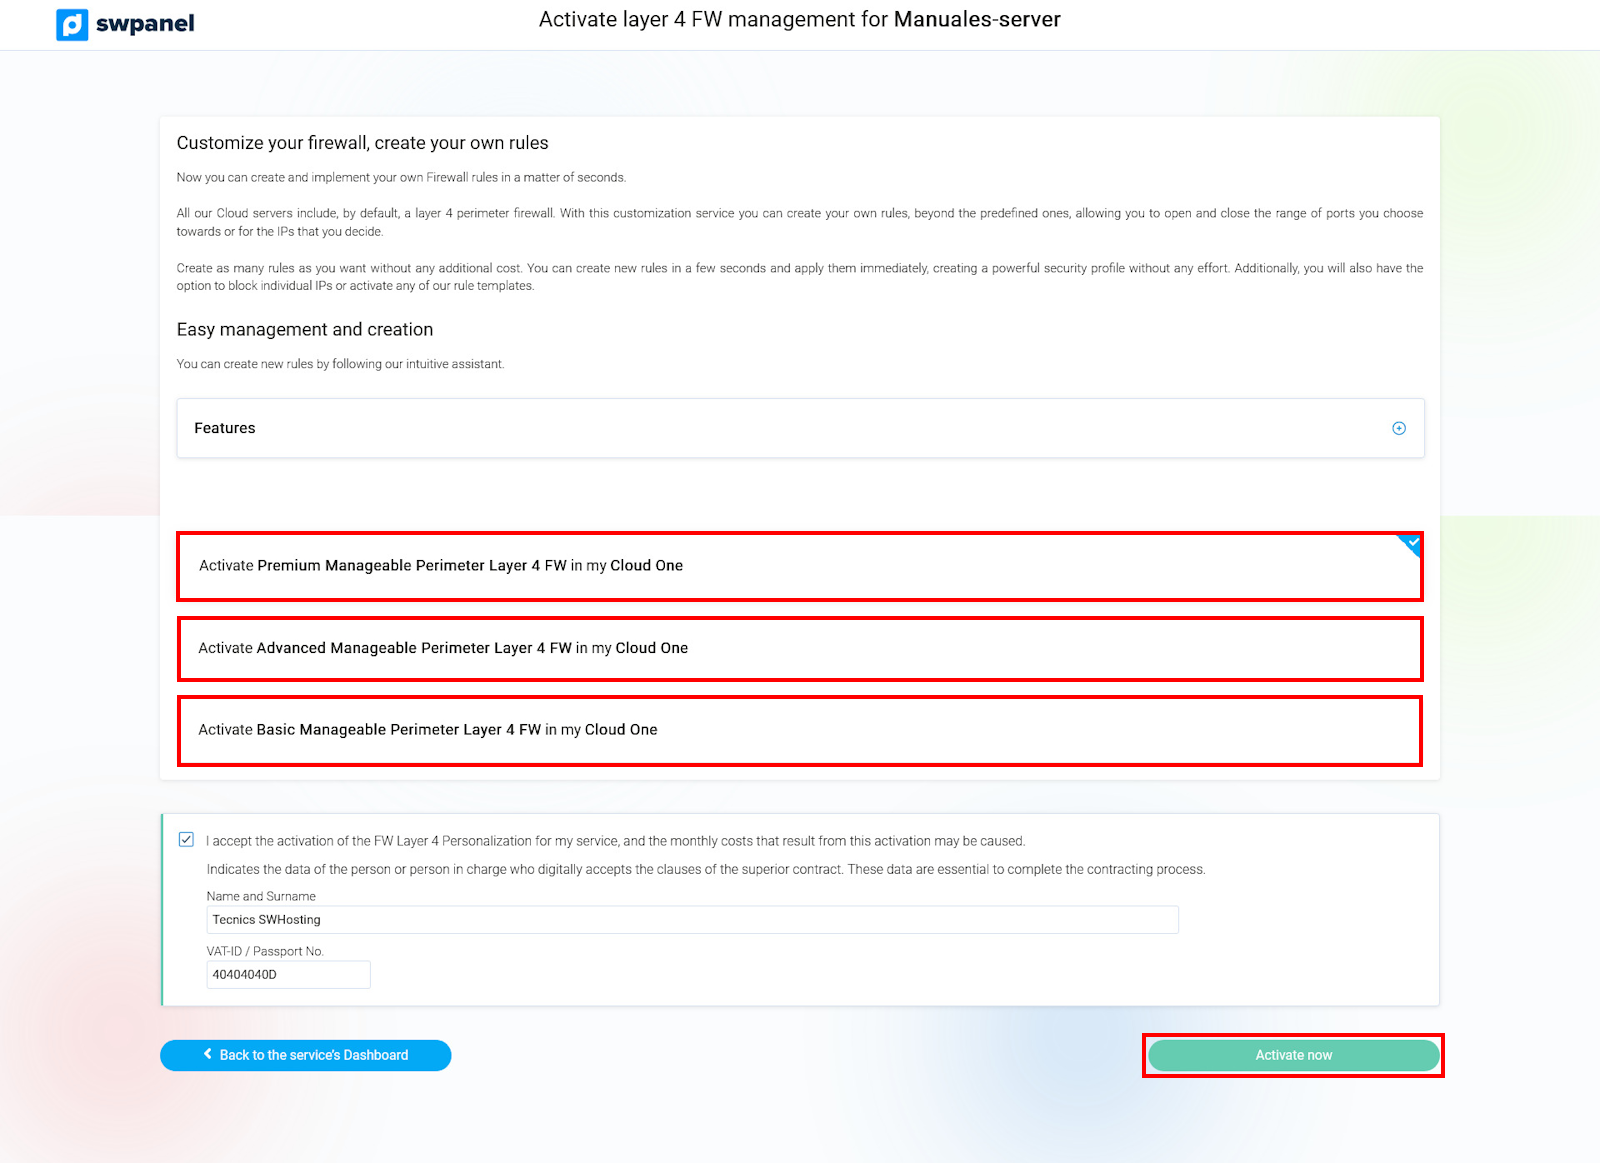
Once you have clicked it, you will be taken to the activation confirmation screen. Simply check the checkbox in the blue box and confirm the activation by clicking on the "Activate Now" button below.

info_capture The screenshot is for guidance only. It was taken on version 2025.00.0017 with date 14/12/2024. It may differ from what the current version of SWPanel displays.
It will be activated in a few seconds and the Dashboard of the service will show you the switch in green as you have already activated it.
The first step is to access the service tree of your SWPanel.
Find the Cloud or server you want to activate the Layer 4 Firewall Management and click to open the ... menu that you will find on the left side.
Inside the menu you will find the Security Services section, click on the Dashboard FW Layer 4 option.
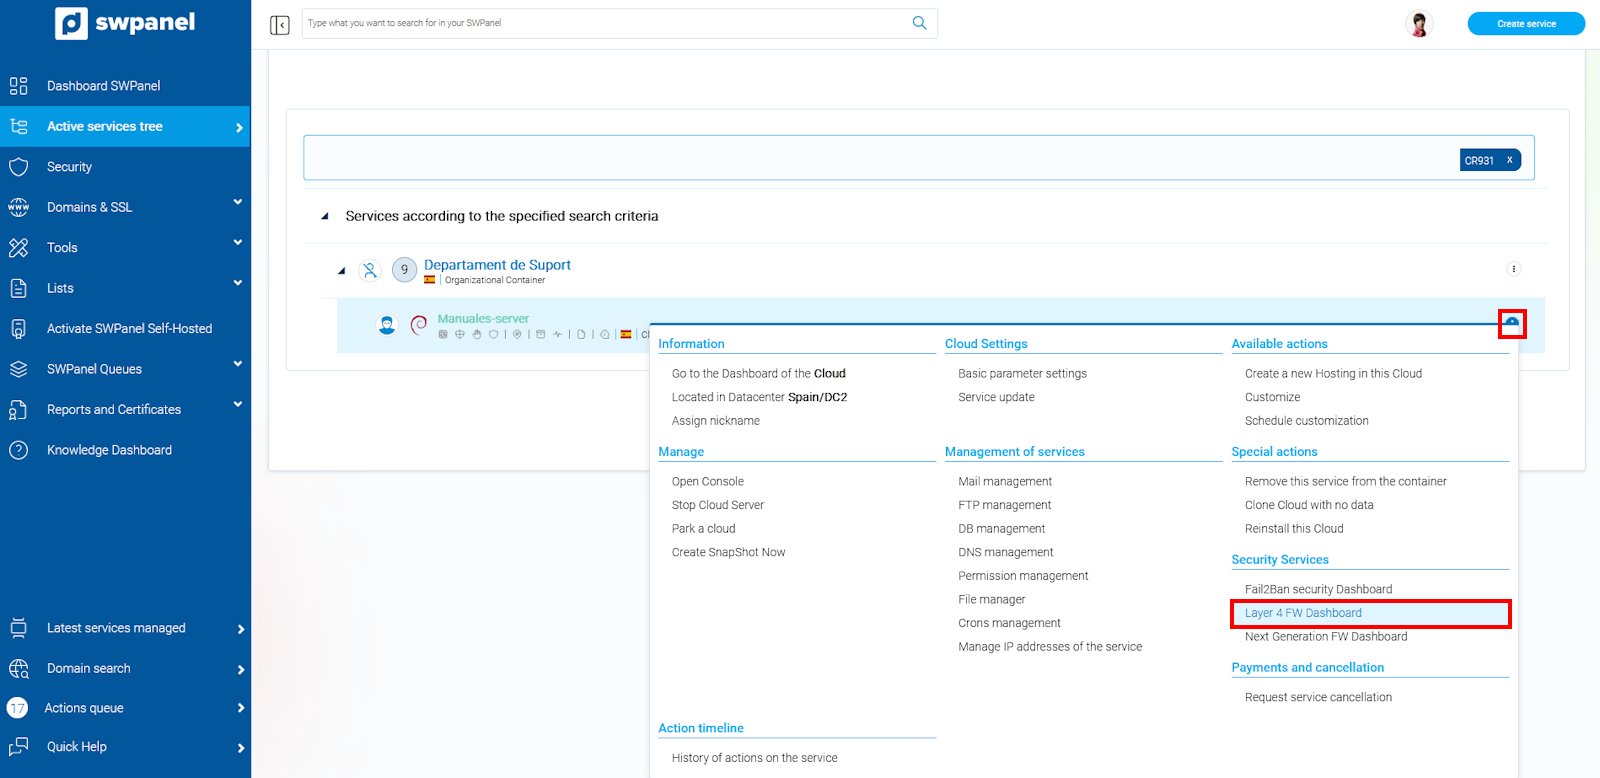
info_capture The screenshot is for guidance only. It was taken on version 2025.00.0017 with date 14/12/2024. It may differ from what the current version of SWPanel displays.
SWPanel will take you to the Security Profiles tab of your service.
In this tab you will find a black button that will allow you to activate the management of your Firewall.
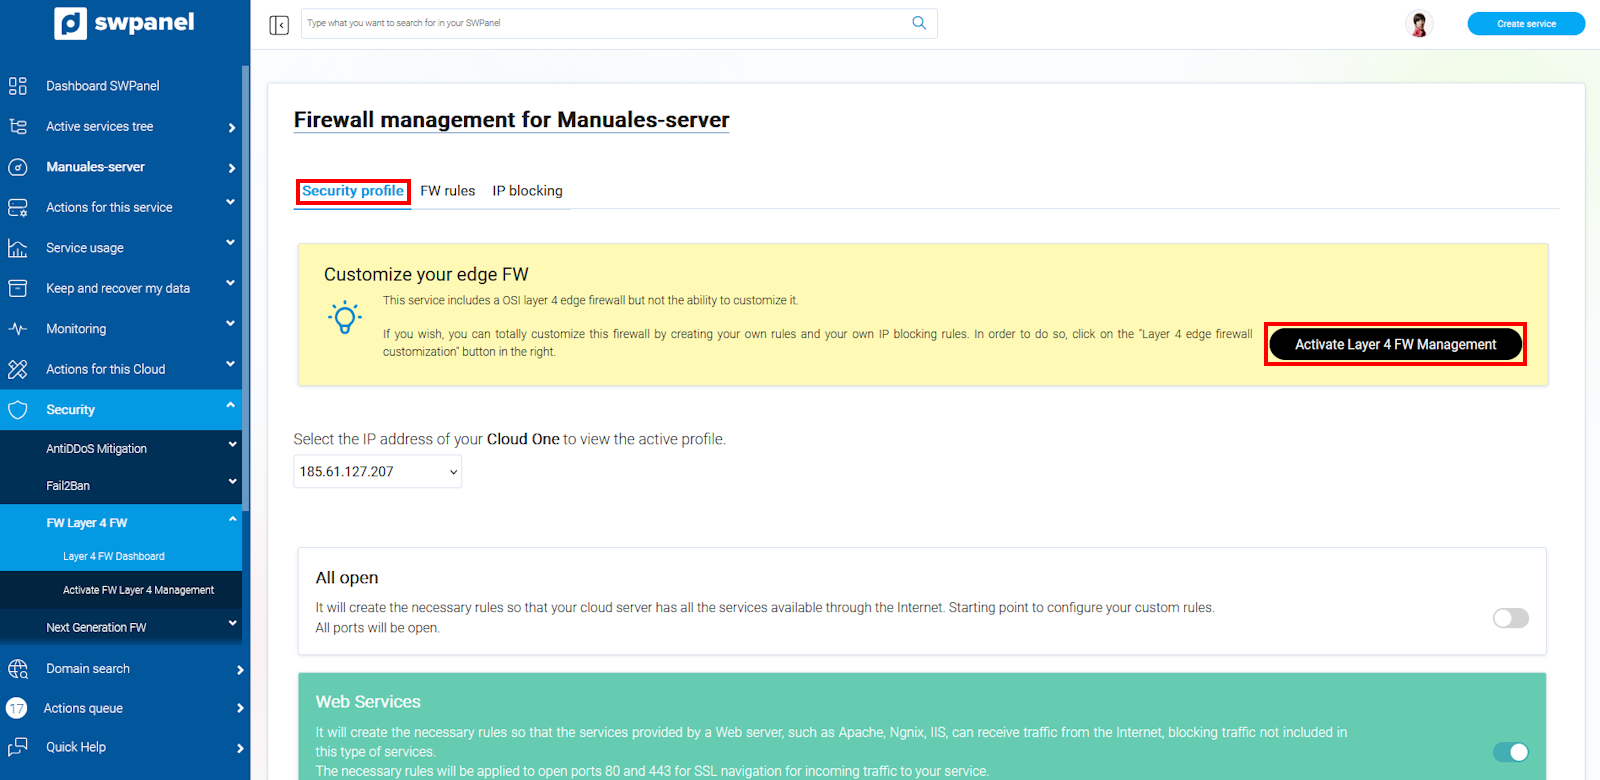
info_capture The screenshot is for guidance only. It was taken on version 2025.00.0017 with date 14/12/2024. It may differ from what the current version of SWPanel displays.
Once clicked, you will access the activation confirmation screen. Simply check the checkbox in the blue box and confirm the activation by clicking on the "Activate Now" button below.
info_capture The screenshot is for guidance only. It was taken on version 2025.00.0017 with date 14/12/2024. It may differ from what the current version of SWPanel displays.
In a few seconds it will be activated and the Dashboard of the service will show you the switch in green as it is already activated.
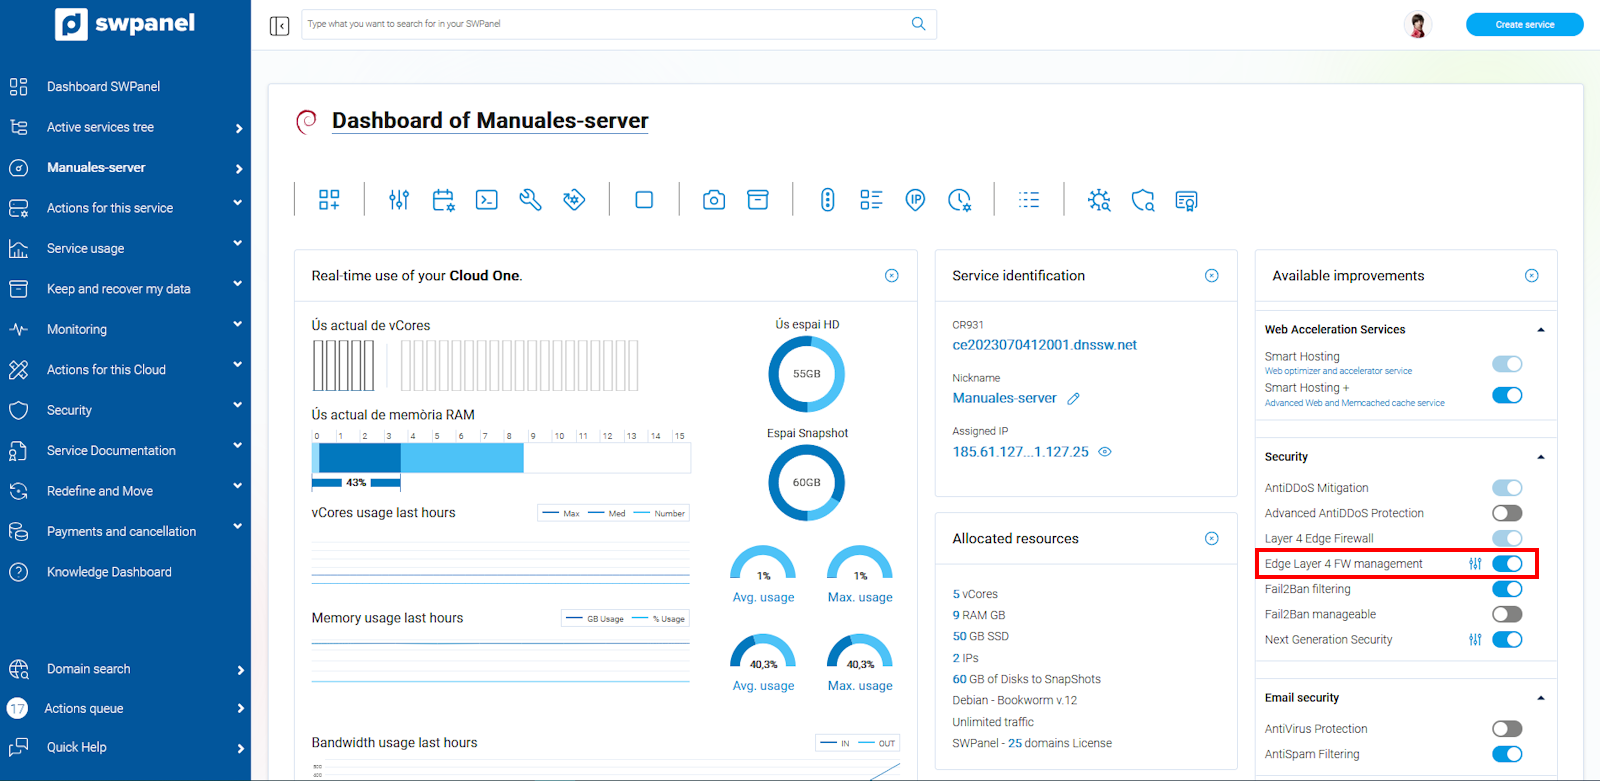
The first step is to choose the Cloud or server on which you want to disable the Firewall management.
Go to the services tree of your SWPanel.
info_capture The screenshot is for guidance only. It was taken on version 2025.00.0017 with date 14/12/2024. It may differ from what the current version of SWPanel displays.
Select the server or Cloud on which you want to disable Firewall management.

info_capture The screenshot is for guidance only. It was taken on version 2025.00.0017 with date 14/12/2024. It may differ from what the current version of SWPanel displays.
Once selected, SWPanel will show you the Dashboard of this service.
In the Dashboard you will find the Available Enhancements box where you will see the Layer 4 Firewall Management option and a switch that will be active (green).
Click on the switch to deactivate it.
info_capture The screenshot is for guidance only. It was taken on version 2025.00.0017 with date 14/12/2024. It may differ from what the current version of SWPanel displays.
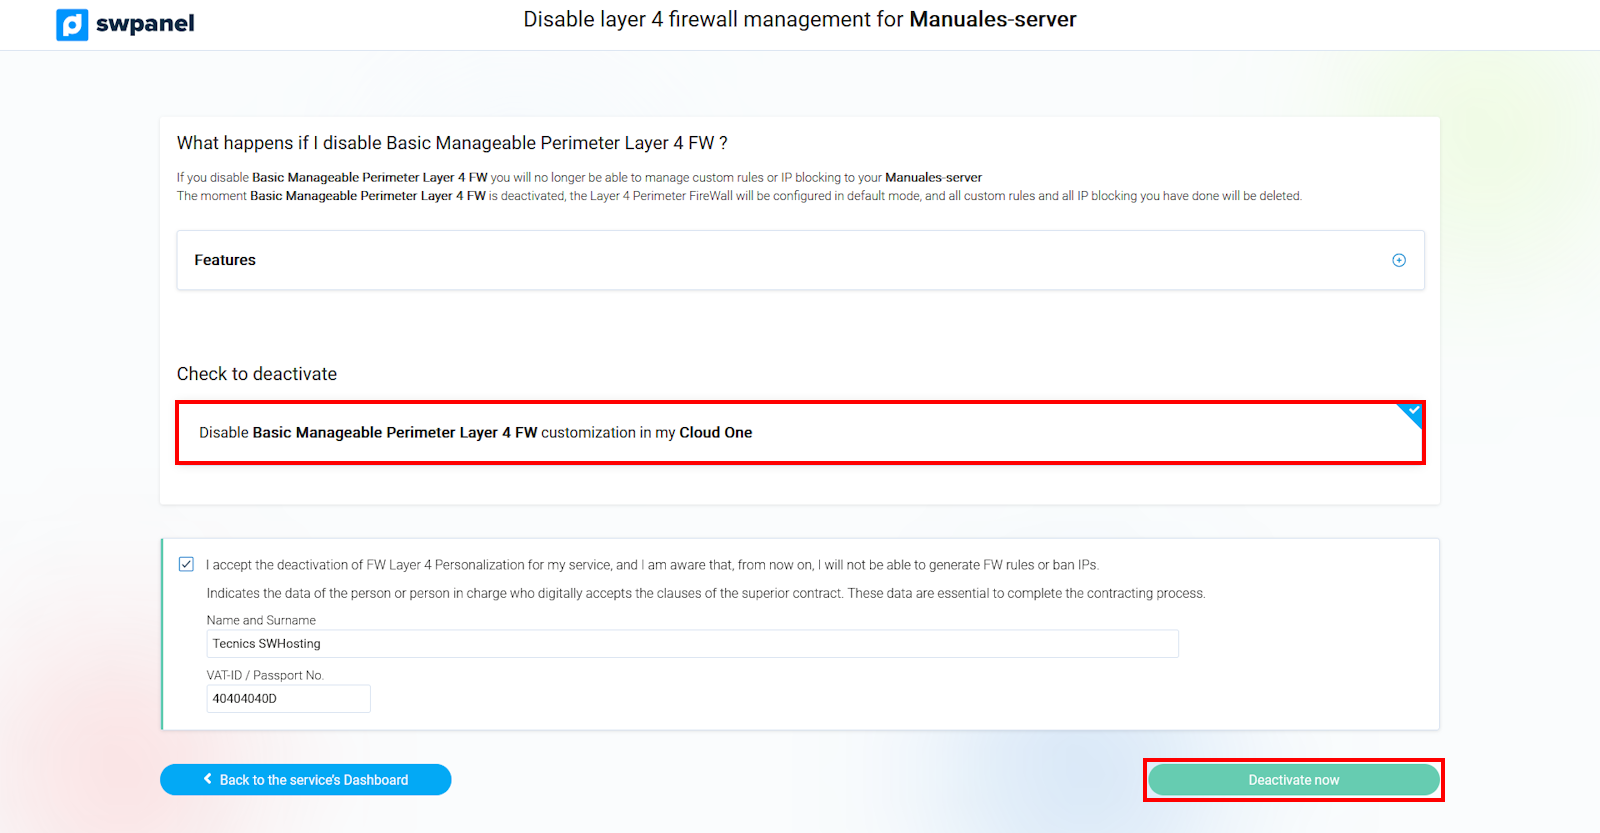
Once clicked, you will be taken to the deactivation confirmation screen. Simply check the checkbox in the blue box and confirm that you want to disable Layer 4 Firewall Management by clicking on the Disable Now button.
info_capture The screenshot is for guidance only. It was taken on version 2025.00.0017 with date 14/12/2024. It may differ from what the current version of SWPanel displays.
Just like that, in a few seconds it will be deactivated and the Dashboard of the service will show you the switch in white (off).
info IMPORTANT:** When you disable Layer 4 Firewall Management, all the rules you have created and all the IPs you have banned will be deleted, and the Firewall will switch back to transparent or standard mode.
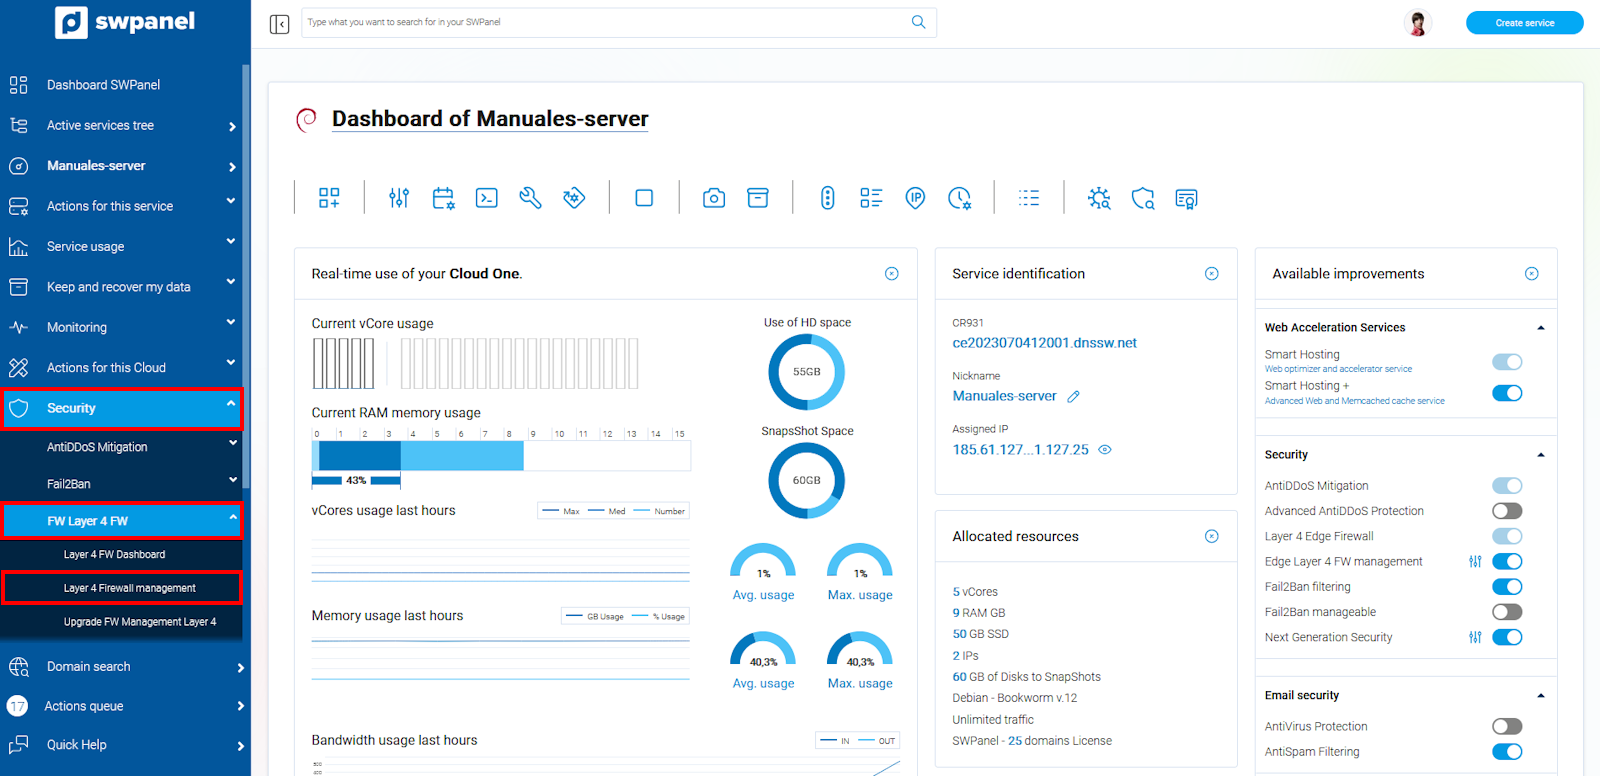
Once the management is activated, it will appear in the side menu of the SWPanel to the Dashboard of your service, within Security, in the FW Layer 4 section there is the option Layer 4 Firewall Management.
info_capture The screenshot is for guidance only. It was taken on version 2025.00.0017 with date 14/12/2024. It may differ from what the current version of SWPanel displays.
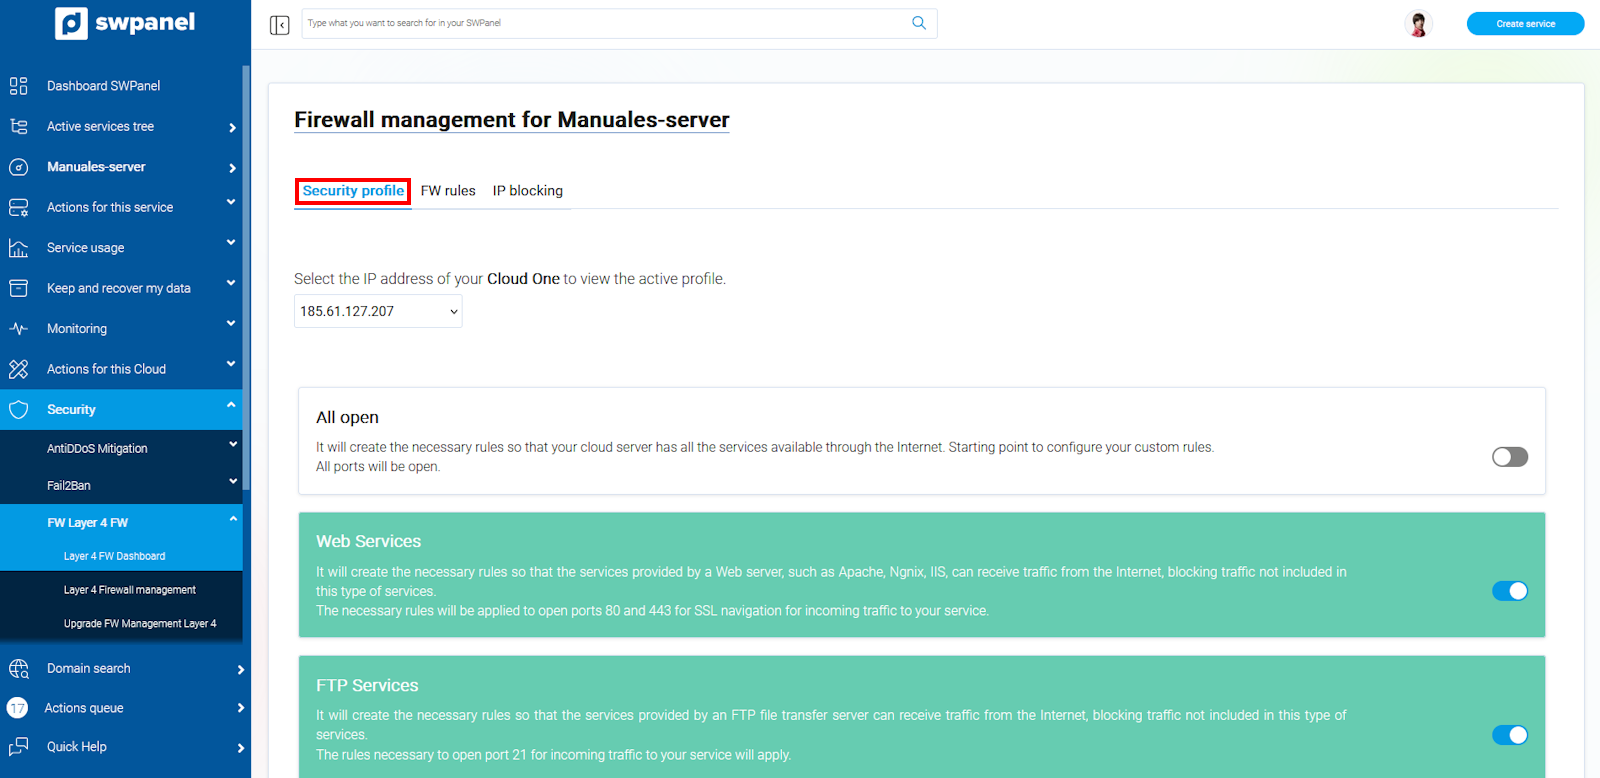
Click on this option and you will access your Layer 4 Firewall for the service you have selected. Your Layer 4 Firewall will allow you complete management through 3 major security blocks:
A default security profile is a set of rules already offered automatically by SWPanel, which will be applied to your Layer 4 Firewall to allow the services associated with each profile to function correctly and securely.
info_capture The screenshot is for guidance only. It was taken on version 2025.00.0017 with date 14/12/2024. It may differ from what the current version of SWPanel displays.
The first thing you must select is the IP of your Cloud or server on which you want to apply the profiles. If you have several IPS you must select them in the drop-down menu above.
SWPanel already offers you, preset, multiple security profiles depending on the services your cloud or server is using.
To enable or disable any of these profiles, simply click the switch on the right side of each of the profile blocks.
Once the changes have been made, a blue warning will appear at the top of the screen to apply the changes you have made.
info IMPORTANT:** Until you click the apply change button, the changes will not be applied to your Layer 4 Firewall, so the changes will not be active.
The profiles you have active will appear in green and those that are not active will appear in white.
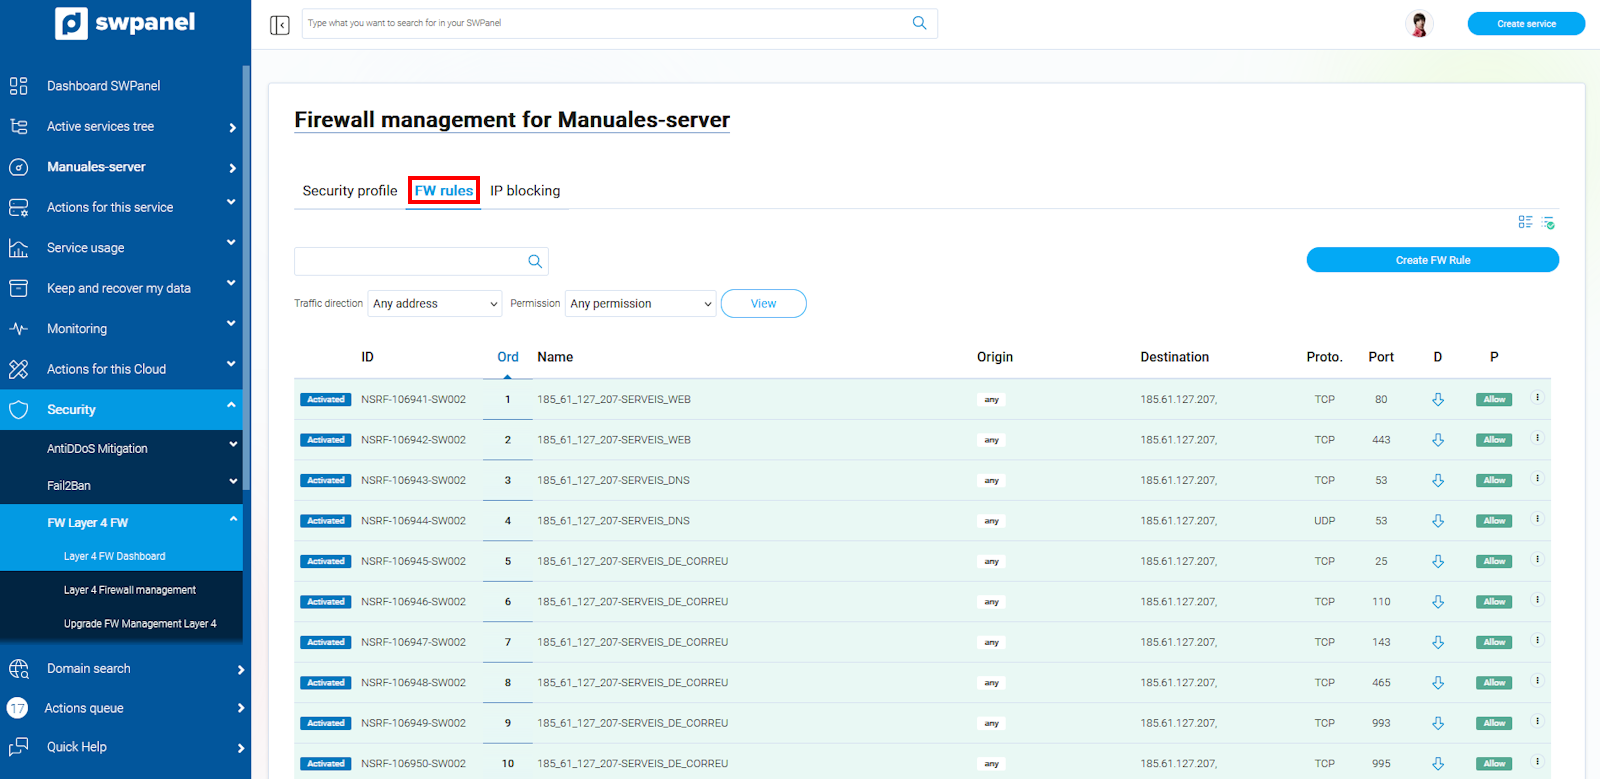
The information on this tab is much more technical, it informs you of the rules currently applied to your Layer 4 Firewall and the IPs on which they are applied.
info_capture The screenshot is for guidance only. It was taken on version 2025.00.0017 with date 14/12/2024. It may differ from what the current version of SWPanel displays.
The rules that appear in green color are rules associated to the security profiles and cannot be modified or deleted from this tab. These rules must be managed directly from the security profiles tab.
The rules in yellow color are those associated to a blocked IP. These rules must be managed from the IP blocking tab.
Indicates whether the rule is enabled or disabled in the Firewall.
Indicates the rule identifier (internal control numbering), it is simply an informative value.
The order is very important, since the rules will be executed in the order indicated. You should note that rules that contradict each other may be valid if they are executed in the correct order.
The order of execution is always from lowest to highest.
Name of the rule (for information only)
Will indicate the origin of the traffic to be handled by this rule.
If the "year" box appears, it means that it applies to any source IP.
Will indicate on which destination IP this rule will be applied. Normally these IPs are those of our cloud or service.
Indicates the type of protocol on which the rule is applied, TCP or UDP.
Indicates the port or range of ports on which this rule will be applied.
If the "year" box appears, it means that it applies to any port.
To define a port range, the hyphen must be used as a separator. For example: 4500-5000 (without spaces). This will open ports from 4500 to 5000 (both included).
The rule must be applied to stop incoming traffic or outgoing traffic.
The green "Allow" box means that this traffic is allowed.
The orange "Deny" box indicates that this traffic is not allowed.
Displays the menu of options available for this rule
By clicking this button you will be able to create a new rule in your Layer 4 Firewall. To create the rule you must fill in all the required fields.
The meaning of each field is described in detail in the previous section.
info You will find a blue info box with a link to consult the ports on which you can create your rules and the usage of each port.
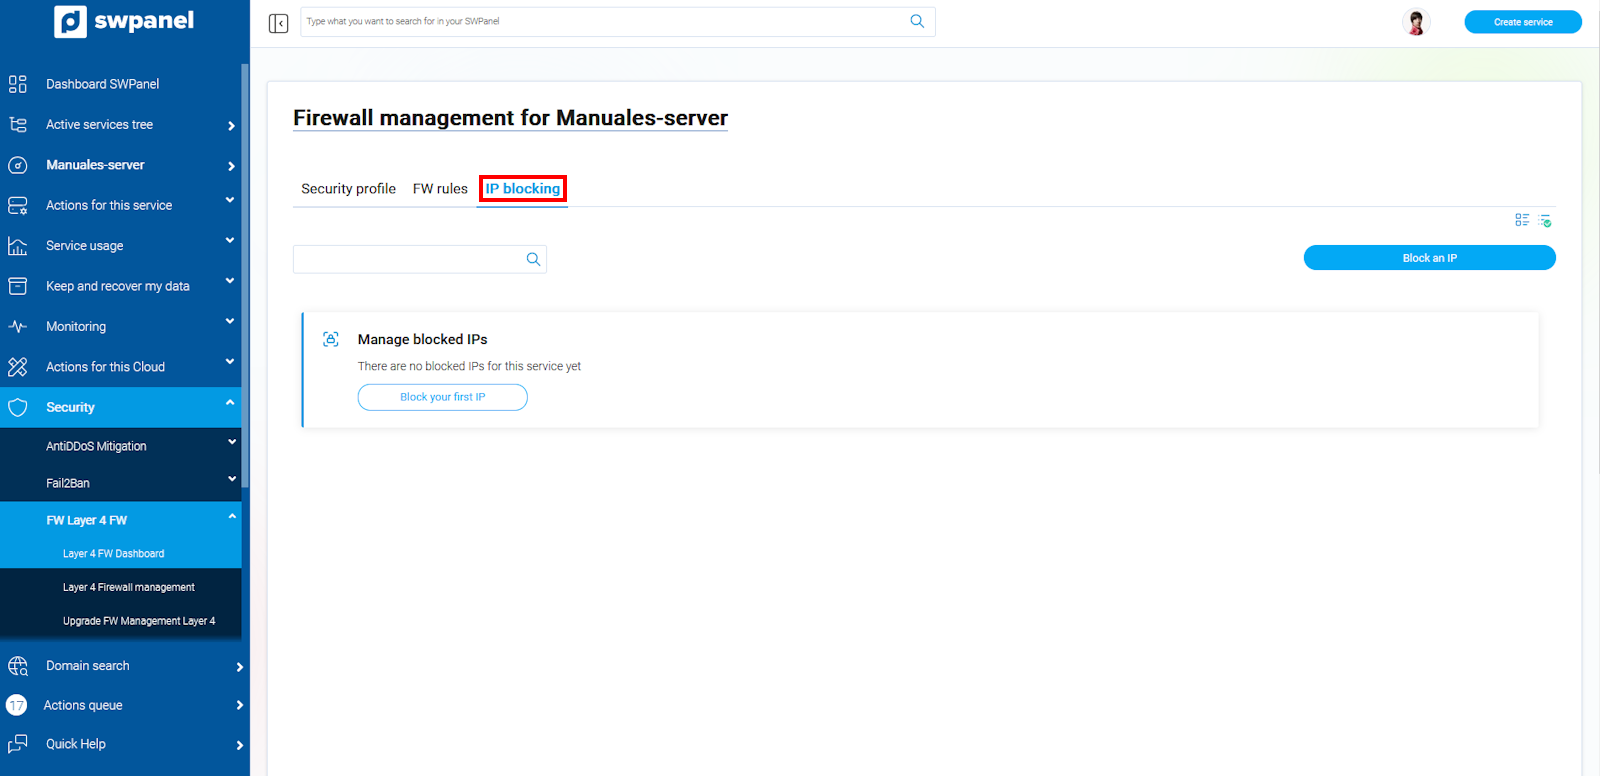
This tab will show you all the IPs that are blocked from accessing your Cloud or Server regardless of the port or protocol they want to access.
info_capture The screenshot is for guidance only. It was taken on version 2025.00.0017 with date 14/12/2024. It may differ from what the current version of SWPanel displays.
Indicates whether it is being applied or not. If lockout is enabled a blue box will appear indicating "enabled".
Indicates the lock identifier (internal control numbering), it is simply an informative value.
Source IP we want to block
To which of the IPs of our cloud or server we want to block access to the Source IP
Displays the menu of options available for this IP blocking.
The process of blocking an IP is very simple:
Click on the block an IP button.
The IP blocking screen will open.
Indicate the IP you want to block in the Source field.
In Destination you must check the IPs of your cloud or server to which you want to block the access of the IP that you have indicated in "Origin".
If you want to activate the blocking right now, remember to check the "checkbox" in the yellow box.
Once everything is filled in correctly, the "Block IP" button will appear, just click on it to block it.
If you want to unblock an IP that you have blocked, the easiest way is to clear the block.
To clear the block use the [ ... ] menu of the blocked IP line in the list and select the Clear this blocked IP option.
Once you confirm that you want to delete it, the IP will no longer be blocked in a few moments and this line will disappear from the list of blocked IPs.