In this manual we will show you how to install osTicket on your server.
info A completely empty Debian 10 server (without SWPanel) has been used for the manual. Most of the installation will be done through the console.
To be able to install the osTicket software you need to fulfill a series of prerequisites:
root user)We execute the following commands from the terminal with the root user:
sudo apt update && sudo apt -y upgrade
sudo apt install -y unzip
sudo apt install apache2 apache2-utils
systemctl enable apache2
www-data (apache user) as owner of the web rootchown www-data:www-data /var/www/ -R
sudo apt install mariadb-server mariadb-client
systemctl enable mariadb
apt install php7.3 libapache2-mod-php7.3 php7.3-mysql php-common php7.3-cli php7.3-common php7.3-json php7.3-opcache php7.3-readline
a2enmod php7.3
systemctl restart apache2
Execute the following commands from the terminal with the root user:
wget -q https://github.com/osTicket/osTicket/releases/download/v1.15.2/osTicket-v1.15.2.zip
unzip -q osTicket-v1.15.2.zip
mv upload/ /var/www/osticket
rm -r scripts
rm -r osTicket-v1.15.2.zip
cp /var/www/osticket/include/ost-sampleconfig.php /var/www/osticket/include/ost-config.php
chown www-data: /var/www/osticket/include/ost-config.php
We are going to create the database to work correctly with the application
root user and its passwordmysql -u root -p
(we will enter the root user password and press enter)
create database osticket charset utf8mb4 collate utf8mb4_unicode_ci;
create user osticket@localhost identified by 'XXXXXXXX';
grant all privileges on osticket.* to osticket@localhost;
exit
Let's configure the web server to work correctly with the application.
nano /etc/apache2/sites-available/osticket.conf
Alias /osticket /var/www/osticket
Close the file saving the changes by pressing Ctrl+X and pressing y+enter.
Activate the new configuration
a2ensite osticket.conf
systemctl reload apache2
We install the necessary extensions for the application to work correctly.
apt install -y php7.3-apcu php7.3-gd php7.3-imap php7.3-intl php7.3-mbstring php7.3-xml
systemctl reload apache2
The last phase of the installation is to configure the application through a web browser where it will allow us to create the administrator user and will ask us for the database data.
To access this configuration, open a web browser and search for http://dominio/osticket or http://nombre-de-la-maquina/osticket.
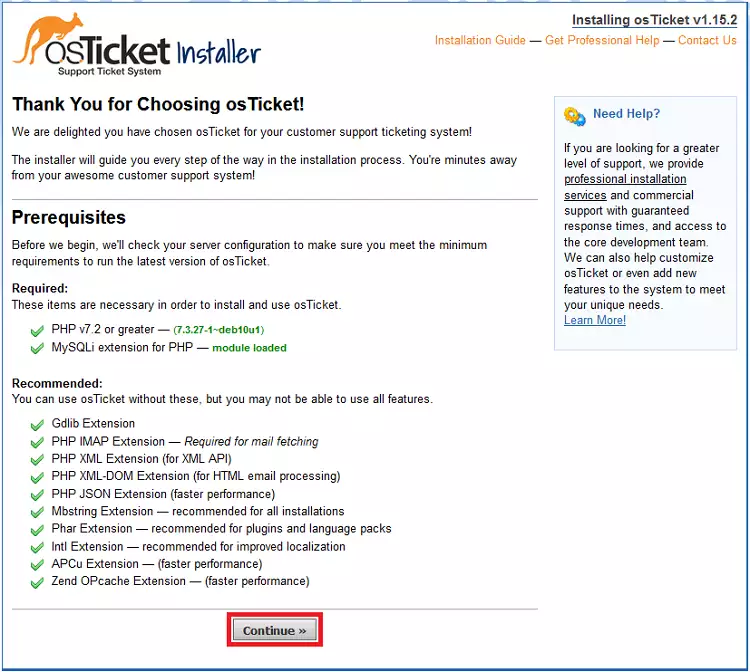
The first page will show us a series of checks, if we have followed the manual, we will have them all correct and we will click on Continue.
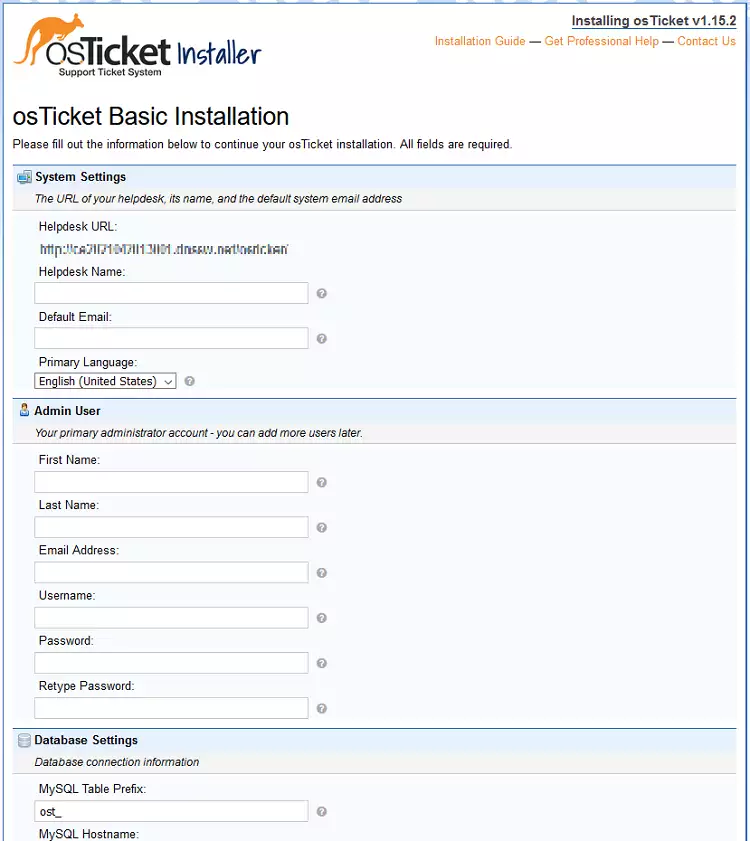
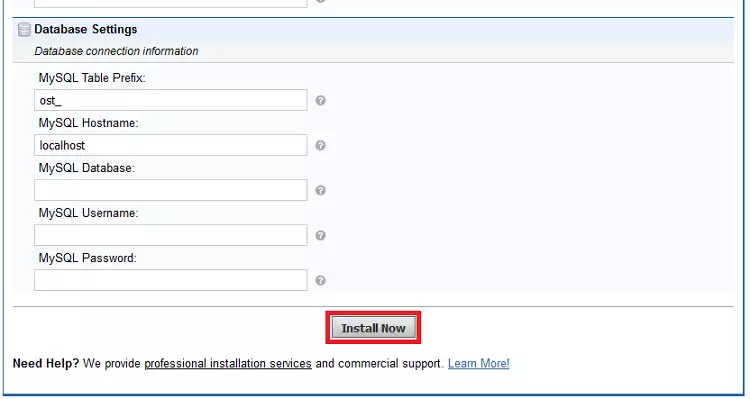
In the next page it will let us create the administrator user, its password and it will ask us for the database connection data. Once entered we will click on Install Now. Required data:
The installation process will take a moment and will show us a last page where it will inform us of the successful result of the operation and will suggest us to give permission to the configuration file of the application.
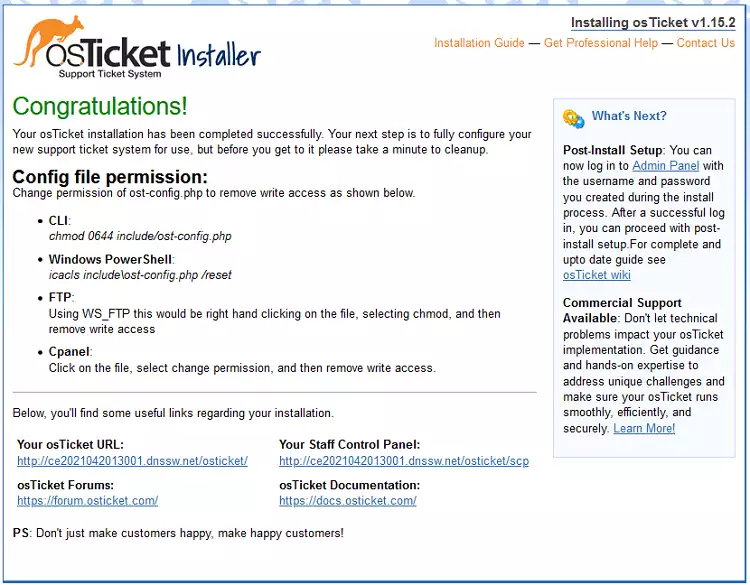
rm -rf /var/www/osticket/setup/
chmod 0644 /var/www/osticket/include/ost-config.php
success That's it! We will be able to access our osTicket service using the URL:
http://dominio/osticket

To access the backend we will do it through the same URL but adding "/scp" at the end (http://dominio/osticket/scp).
To be able to modify the language of the application we have to download the file of the language we are interested in from the official page of the application, pass the file by FTP and unzip it in the correct location. As the server we are using is an empty Debian 10, the first thing to do is to create a user and install the FTP service.
adduser testftp
enter.enter.5 enter, press y + enter.sudo apt -y install vsftpd
nano /etc/vsftpd.conf
...
write_enable=YES
...
ssl_enable=YES
...
Close the file with Ctrl + x and save it with y + enter.
Restart the service for the modifications to take effect.
systemctl reload vsftpd
Download the language pack from the official [osTicket] web site (https://osticket.com/download/) by clicking on Language pack, selecting the language (Spanish - Español) and clicking on Download.
FTP the language pack to the server with an FTP client such as Filezilla.
Unzip the package to the correct directory
unzip /home/testftp/osTicket-lang.zip -d /var/www/osticket/include/i18n/
Enter the backend with the URL http://domain/osticket/scp
Use the administrator user credentials to log in.
Click on the settings tab.
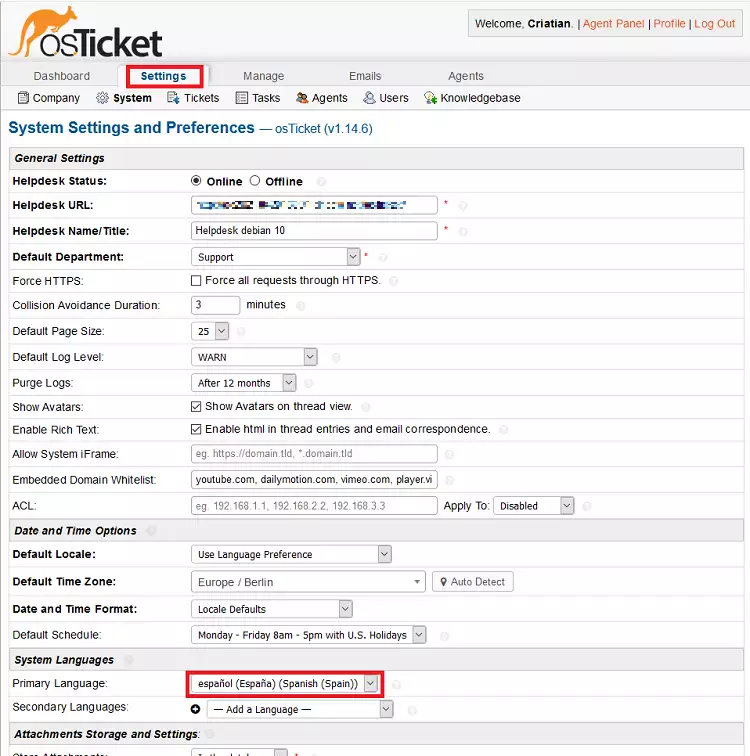
We look for the option Primary Language and select "spanish (Spain) ".
Go down to the bottom of the page and click on Save Changes.
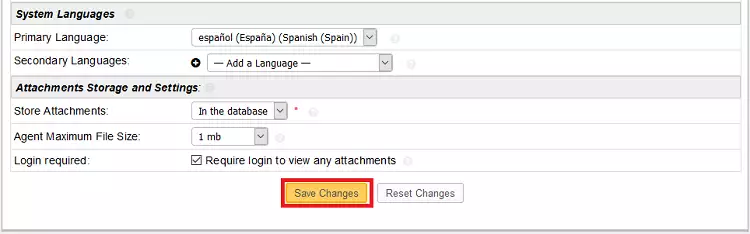
info Done! If we change tabs or exit, the language is already modified.